


Best Fabric & Upholstery Protectors 2025: Stain Tests & Reviews
September 4, 2025
The Ultimate Stress-Free Super Bowl Party Playbook: From Kickoff to Cleanup
September 7, 2025

Discover Your Scope Creep Risk
Take our 2-minute assessment to identify your vulnerabilities and get personalized recommendations
Are you dreaming of that perfect kitchen remodel or a beautifully finished basement? You've got the vision, the budget, and even a start date locked in. Everything seems on track for your ideal home transformation. But fast forward a few weeks, and suddenly your contractor is talking about unexpected costs, extended timelines, and "a few small changes" that weren’t part of the original plan.
Welcome to the frustrating world of scope creep where a simple project can snowball into an expensive, time-consuming ordeal.
Scope creep isn’t always loud or obvious. It creeps in quietly, disguised as harmless additions:
"Since we're replacing the cabinets, why not upgrade the countertops too?"
"We discovered an issue behind the walls better fix it now."
"Oh, and how about adding some extra outlets while we're at it?"
Each change might seem reasonable on its own, but together, they can derail your budget, overwhelm your schedule, and leave you wondering how things got so out of control.
But here’s the good news: scope creep is preventable.
This guide is your ultimate defense against the chaos. You’ll discover proven strategies to:
- Identify red flags before they become problems
- Set clear expectations from the start
- Communicate effectively with contractors
- Make smart, timely decisions that keep your project on track
Whether you're planning a bathroom upgrade, a new deck, or a full-scale renovation, you'll walk away with the tools and confidence to take charge of your project without the spiraling costs and never-ending delays.
Let’s stop scope creep before it starts and take back control of your home improvement journey.
What is Scope Creep and Why It Matters in Home Improvement?
Defining Scope Creep for Homeowners
Scope creep might sound like technical jargon best left to project managers, but if you've ever done a home renovation, chances are you’ve felt its effects firsthand.
In simple terms, scope creep is when a home improvement project quietly expands beyond its original plan. It starts after the project kicks off, often with good intentions. Maybe you decide to upgrade your kitchen cabinets mid-project or realize halfway through that the flooring in the next room "might as well" be redone too.
It’s what we like to call “the snowball effect.” One small change leads to another, and before you know it, your well-planned renovation has grown into something much bigger, more expensive, and more complicated than you ever expected.
Here are some common signs that scope creep has entered your project:
- Adding new features that weren’t in the original agreement ("Let’s also install under-cabinet lighting while we’re at it.")
- Upgrading materials during the build ("Why not go with marble countertops instead of laminate?")
- Altering design plans mid-construction ("Actually, I want an open concept instead of separate rooms.")
- Uncovering unexpected problems, like plumbing or electrical issues, that require additional work and decisions
While it may seem like you're just improving your home more thoroughly, unchecked scope creep can have serious consequences especially when you're not prepared.
The Detrimental Impact on Home Projects
💸 Financial Strain
Scope creep is a silent budget killer. Each new task or material upgrade may seem minor at first but they add up quickly. Suddenly, you're dipping into savings or borrowing money to cover costs you didn’t anticipate. Even worse, contractors may charge premium rates for last-minute changes or additions.
⏳ Timeline Delays
Time is another hidden casualty. Changing plans midstream often means reordering materials, revisiting permits, or waiting for specialized tradespeople. Your three-week bathroom remodel? It might stretch into two months, with your family navigating around plastic sheets and power tools the whole time.
😣 Increased Stress & Anxiety
The emotional toll is real. Constant decisions, shifting deadlines, and money conversations can lead to decision fatigue, strain relationships with contractors, and even cause tension within your household. What was supposed to be an exciting transformation starts feeling more like a burden than a dream come true.
🧱 Compromised Quality
Trying to make up for lost time or ballooning costs can result in rushed work or cheaper shortcuts. When the budget gets tight due to earlier changes, homeowners are sometimes forced to cut corners just to reach the finish line often sacrificing quality in the process.
🚧 Unfinished Projects
In worst-case scenarios, scope creep leads to projects being paused or abandoned altogether. The dream kitchen turns into a long-term construction zone, and the dust never quite settles literally or emotionally.

Why Scope Creep Deserves More Attention
What sets scope creep apart from other project challenges is its emotional impact. It builds gradually, often hidden beneath the excitement of upgrading and “getting it just right.” But it leads to feelings of regret, overwhelm, and helplessness when things spiral.
You may start to doubt your decisions, lose trust in your contractor, or feel stuck living in a home that’s neither functional nor finished. This emotional weight is just as important as the financial and logistical stress, and it’s why understanding and preventing scope creep matters so much.
Common Causes of Scope Creep in Home Projects
Understanding the root causes of scope creep is your first line of defense. Most homeowners don’t set out to derail their project but without careful planning and communication, even the most straightforward renovation can slowly unravel. Let’s break down the most common reasons scope creep happens and how to avoid them.
1. Unclear Initial Planning & Ambiguity
When the blueprint is vague, the build is bound to shift.
Many home improvement projects begin with a general idea “I want a modern kitchen” or “Let’s freshen up the bathroom.” But without detailed, written plans, this ambiguity becomes a breeding ground for misunderstandings and mid-project changes.
What this looks like:
- Not specifying the exact brand or model of fixtures
- Leaving room measurements “flexible”
- Skipping written documentation because it’s a “small project”
Expert Tip:
Before any work begins, write down every detail no matter how minor it seems. This includes materials, finishes, design sketches, electrical plans, and even brand preferences. Treat every home improvement like a business deal. Clear plans = fewer surprises.
2. Changing Minds Mid-Project (The “While We’re At It” Mentality)
Here’s a familiar scene: your contractor is halfway through replacing your bathroom vanity, and you think, “Since the wall’s open, maybe we should just install a new mirror... and lighting... and, hmm, maybe some floating shelves too?”
This is the slippery slope of the “while we’re at it” syndrome where good intentions and new ideas multiply once you see progress happening in real time.
Why this happens:
- You see the space evolving and suddenly feel inspired
- A family member makes a “helpful” suggestion
- You fear missing an opportunity to get things “just right”
The psychological challenge:
Saying “no” to spontaneous ideas especially your own can be tough. You don’t want to feel like you’re settling. But every addition means new costs, timelines, and potential complications.
Differentiation Opportunity – How to Say No Without Regret:
- Remind yourself of your original why: What was the goal of the project?
- Create a "future wishlist" for ideas that come up mid-project. You’re not saying no forever just not now.
- If family members push for extras, use a neutral phrase like, “Let’s finish what we started, then revisit that idea with a fresh perspective.” This keeps things collaborative, not confrontational.
3. Unforeseen Structural or Hidden Issues
Sometimes, it’s not about changing your mind it’s about uncovering the unexpected. Your contractor opens a wall and finds:
- Mold behind old drywall
- Knob-and-tube wiring from the 1950s
- A load-bearing beam that was never reinforced
These aren’t design upgrades they’re problems that must be solved. But they still expand the scope of your project, sometimes significantly.
Expert Tip:
Know the difference between a “new idea” and a “problem to solve.”
- New idea? You can choose to delay or reject it.
- Problem? It must be addressed to complete the project safely and legally.
Building a contingency fund into your budget (typically 10–20%) gives you breathing room for the unexpected without derailing your financial plan.
4. Poor Communication & Misunderstandings
A major cause of scope creep isn’t what’s said it’s what’s not said.
Homeowners often assume that their vision is understood. Contractors may assume certain things are included in the budget. Subcontractors might follow old instructions if no one tells them plans have changed.
Scenario:
You ask your contractor to “upgrade the flooring” in one room. You meant engineered hardwood; they assume high-end tile. By the time the materials arrive, it’s too late (and too expensive) to correct.
The cost?
- Time lost in reordering
- Money wasted on incorrect materials
- Frustration all around
E-E-A-T Tip – Avoid the Assumptions Trap:
- Always confirm big decisions in writing (text, email, or project management app)
- After every meeting or call, send a brief summary to your contractor
- Ask clarifying questions, even if you think you already know the answer
Clear, respectful communication keeps everyone aligned and your project on track.
5. Lack of Formal Change Management
Even small home projects benefit from structure. Without a clear process for handling changes, scope creep sneaks in through verbal agreements and vague commitments.
What happens without a system:
- You ask for an extra built-in bench during construction your contractor says “sure,” but doesn’t adjust the timeline or cost estimate
- You and your partner agree to “figure out the backsplash later” only to find out your choices delay the countertop installation by two weeks
These moments, repeated a few times, lead to a messy and unpredictable project.
Expert Tip:
From day one, establish a change order process:
- Any modification (even minor) requires a written agreement
- Reassess the budget and timeline with each new change
- Apply this process even for DIY projects if you're working with a partner, agree to pause and reassess before adding any new element
This process adds structure to creativity and keeps your renovation from turning chaotic.
The Blueprint for Success: Detailed Planning & Documentation
If scope creep is the storm that threatens your home renovation, detailed planning is your shelter. A solid plan isn't just about picking paint colors it's about creating a roadmap that sets clear expectations, eliminates guesswork, and empowers you to make confident decisions every step of the way.
Crafting Your Project Vision & Detailed Brief
Before swinging a hammer or browsing tile samples, take a step back and ask yourself:
“What am I really trying to achieve with this project?”
Maybe it’s better functionality in your kitchen, more storage in your entryway, or simply modernizing your outdated living room. When you define your “why,” your decisions become clearer and your resistance to unnecessary additions becomes stronger.
Next, turn that vision into a Project Brief, a homeowner-friendly document that includes:
- Project Scope Statement – A clear outline of what the project includes (and doesn’t include)
- Objectives – What you hope to accomplish (e.g., “improve lighting and storage”)
- Deliverables – Tangible results, such as “new cabinetry,” “updated flooring,” etc.
- Success Metrics – How you’ll define a job well done (e.g., “under budget,” “completed within six weeks,” “achieved open layout with seating for six”)
Differentiation Tip:
Consider using a downloadable template to simplify this step. Templates help homeowners organize ideas clearly and communicate with contractors effectively.
Comprehensive Design Plans & Specifications
Jumping into construction without finalized designs is like trying to cook a gourmet meal without a recipe. You might wing it and get lucky but odds are, you’ll waste time, money, and energy correcting missteps.
What to finalize before construction:
- Detailed drawings and layout plans
- Material selections (flooring, fixtures, cabinetry, etc.)
- Finish specifications (paint colors, hardware style, lighting types)
These decisions need to happen before the first nail is hammered, not during the chaos of mid-project problem-solving.
E-E-A-T Insight:
Early design decisions are critical to preventing scope creep. Changing tile mid-project or adjusting cabinet sizes can cause ripple effects that delay timelines and increase labor costs. Plan once, execute with confidence.
Product Recommendation:
Try free or affordable design visualization tools like:
- RoomSketcher – Great for beginners who want simple room layouts
- Planner 5D – Visualize 3D floor plans and furniture
- SketchUp Free – Ideal for more detailed or technical plans
These tools help you “see” the finished project before making irreversible decisions keeping costly surprises at bay.
Written Agreements & Contracts
No matter how friendly your contractor is or how small your project feels, written agreements are non-negotiable.
Your contract is your safety net it protects both you and your contractor by clearly outlining expectations, rights, and responsibilities.
Key elements your contract should include:
- Scope of Work – Specific tasks included in the price
- Payment Schedule – When and how payments will be made
- Timeline – Start and end dates (with some flexibility)
- Change Order Process – A system for requesting and approving changes
- Dispute Resolution – How disagreements will be handled (mediation, arbitration, etc.)
Expert Tip:
Get every agreement quotes, contracts, material lists, changes in writing, signed by all parties. If it’s not documented, it didn’t happen.
Product Recommendation:
Use contract templates (digital or printable) designed for home renovations. Look for ones that include spaces for scope, timeline, payment terms, and change orders.
A service like Panda Doc or Hello Sign
offers digital contract templates
Prioritizing “Must-Haves” vs. “Nice-to-Haves”
Let’s face it: most of us dream big. But real-life constraints like budget, space, and time often mean we can’t have it all. That’s why creating a tiered priority list before you begin is so powerful.
Break your wishlist into two clear categories:
- ✅ Must-Haves: Non-negotiables like improved storage, a functional layout, or replacing a failing roof
- 🤔 Nice-to-Haves: Desirable features like heated floors, high-end fixtures, or built-in wine racks
This list becomes your compass when the unexpected arises. If mold is discovered behind the walls and eats into your budget, you’ll already know what can be deferred or cut without stress or regret.
Expert Tip:
Have this priority conversation early with yourself, your partner, and your contractor. Document it and refer back to it often to prevent emotion-driven decisions later on.
Setting Clear Expectations & Communication Protocols
Renovation success doesn’t come from luck it comes from clarity. Whether you're remodeling a single room or doing a full home upgrade, establishing roles, communicating proactively, and setting realistic expectations can make the difference between a smooth project and a spiraling mess.
Establishing Roles & Responsibilities
Every home project has moving parts and people. Misunderstandings happen when no one’s sure who is in charge of what.
Here’s why this matters:
If the contractor assumes the designer is sourcing the tiles, and the designer assumes it’s the homeowner’s job… guess what? The tiles don’t show up. That delays installation, which delays plumbing, which delays everything.
Avoid the domino effect by clearly defining roles from the start:
|
Role |
Common Responsibilities |
|
Homeowner |
Final decision-maker, budget holder, approvals |
|
Contractor |
Execution, timeline management, labor coordination |
|
Designer |
Aesthetic planning, sourcing materials, space functionality |
|
Subcontractors |
Specific trade work (e.g., plumbing, electrical) |
Pro Tip: Write down everyone’s responsibilities even if you're a DIYer working with a partner. A short shared document or spreadsheet can prevent weeks of frustration later.
Proactive & Frequent Communication
If you're only talking to your contractor when something goes wrong, you’re already behind. Consistent, proactive communication keeps projects moving and minimizes surprises.
Build these habits into your workflow:
- Weekly or Bi-weekly Check-ins
Set recurring meetings with your contractor either on-site or virtually. Use these to review progress, flag concerns, and discuss upcoming tasks. - Preferred Communication Channels
Decide early how you'll communicate. Texts for quick updates? Emails for contracts? A shared folder for documents?
Popular Tools to Consider:
- WhatsApp or Signal group chats for real-time updates
- Trello, Asana, or Houzz Pro for managing tasks and timelines
- Google Drive or Dropbox for sharing files, plans, and receipts
Expert Tip: Whether you're working with professionals or managing your project solo, always communicate clearly, frequently, and proactively with everyone involved including family members. Don’t let assumptions take the wheel.

Managing Family & Partner Expectations
Your contractor isn’t the only person you need to align with. Renovations can strain even the strongest relationships especially when one partner says “yes” to an extra upgrade and the other says “wait, how much?”
To avoid tension:
- Include all decision-makers early. If it impacts budget, layout, or timeline, everyone should have input from day one.
- Establish a unified front. Agree in advance on what's in scope, what’s not, and how you’ll handle unexpected decisions.
Differentiation Insight – Navigating Internal Conflicts:
Try this approach when disagreements arise:
- Pause the decision. Say: “Let’s sleep on it and revisit tomorrow.”
- Redirect the emotion. Focus on the shared goal: “Remember, we both want a beautiful space let’s find the right compromise.”
- Use facts. Pull up the budget or timeline to ground the conversation in reality, not emotion.
Being on the same page with your partner or family isn’t just helpful it’s essential. A renovation affects your home and your life. Protect both.
The Art of Saying “No”
New ideas are exciting. But not every “great” idea is a smart one especially if it pushes you over budget or off schedule.
Learning to say “no” gracefully but firmly is a crucial homeowner skill.
Here’s how:
- Acknowledge the idea:
“That’s a really interesting option…” - State the reason for pausing or declining:
“…but it would push us over budget and delay completion by two weeks.” - Redirect or defer:
“Let’s add it to our future upgrades list and revisit it after this project wraps.”
Not every “no” has to be a hard stop. Framing it as “not now” softens the message and keeps you in control without discouraging creativity.
Mastering the Change Order Process
In a perfect world, every renovation would go exactly as planned. But reality has a different agenda. Materials run out, ideas evolve, and sometimes issues hiding behind your walls demand a change in plans.
That’s why understanding and mastering the change order process is essential for keeping your home project under control.
What is a Change Order?
A change order is a formal, written document used to modify the original scope of work in a construction or renovation project. It can apply to changes in:
- Materials or finishes
- Project tasks or features
- Labor needs or subcontractors
- Budget or timeline
Without a written change order, a simple “can we also add…” can quickly snowball into misunderstandings, delays, and budget blowouts.
Why Change Orders Matter:
- They ensure transparency between homeowners and contractors
- They protect both parties from disputes
- They keep the project documentation clean and traceable
- They help manage budget and time more accurately
When & How to Issue a Change Order
Trigger Points for a Change Order:
- Unforeseen Issues – Hidden mold, outdated wiring, or structural surprises.
- Homeowner-Requested Changes – Wanting to add recessed lighting, upgrade flooring, or shift the layout mid-project.
- Material Substitution – Original fixtures are backordered or discontinued, and an alternative is required.
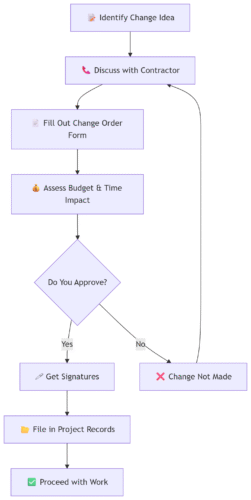
Step-by-Step: How to Handle a Change Order
Here’s a simple, E-E-A-T-aligned process any homeowner can follow:
- Identify the Change
Spot the need either from your side or the contractor’s. Clearly define what’s changing and why. - Document the Details
Use a formal Change Order form (paper or digital). Include:
- Description of the change
- Affected area or system (e.g., electrical, structural)
- Why the change is necessary
- Description of the change
- Assess Impact
Your contractor should provide:
- Cost impact: Added or reduced
- Time impact: Added or reduced days/weeks
- Cost impact: Added or reduced
- Review the Revised Scope
Ensure the new total project cost and completion date are updated. - Sign Off
You, your contractor, and any other stakeholders must sign the change order before any new work begins. - Store It Safely
Add the document to your project file whether it’s a physical binder or cloud folder (like Google Drive or Dropbox).
Key Components of a Change Order
A complete and effective change order should always include:
|
Component |
Why It Matters |
|
Clear Description |
Avoids misinterpretation or missed work |
|
Cost Adjustment |
Ensures no financial surprises |
|
Time Impact Estimate |
Helps manage project schedule |
|
Revised Project Totals |
Keeps all parties aligned |
|
Signatures |
Makes the change legally binding |
Interactive Change Order Flowchart & Template
Visual Example: What a Change Order Looks Like
A clear change order form is simple and direct. Here’s an example of how a completed section might appear:
| Change Description: | Upgrade master bathroom vanity from standard stock model to custom-built, solid walnut vanity with integrated sink. |
|---|---|
| Reason for Change: | Homeowner requested upgrade for aesthetic and durability reasons. |
| Cost Impact: | + $1,200.00 |
| Time Impact: | + 4 business days (for fabrication and delivery) |
| New Project Total: | $18,700.00 |
| New Completion Date: | May 10, 2024 |
| Approvals: | |
| Homeowner: | ___________________________ Date: _________ |
| Contractor: | ___________________________ Date: _________ |
Getting Sign-Off & Staying Organized
A change order isn’t official until it’s signed. No verbal agreements, no “we’ll remember” get it in writing before any work begins.
Why it’s crucial:
- Prevents disputes or finger-pointing later
- Keeps financial records accurate
- Supports your case in case of future legal issues or insurance claims
Storage Tips:
- Physical Binder: Create project sections (Budget, Design, Change Orders, Receipts)
- Cloud Storage: Use tools like Google Drive, Notion, or Evernote with folders for each phase
- Name files consistently (e.g., “CO1_VanityUpgrade_0412”)
-
Budget & Timeline Management Strategies
Dreams build momentum, but budgets and schedules build reality. Even the most exciting renovation can become overwhelming if costs spiral or timelines slip. That’s why mastering financial and timeline discipline is essential to preventing scope creep and to finishing your project with peace of mind.
Contingency Planning: Your Financial Safety Net
Unexpected costs aren’t a maybe they’re a guarantee. Whether it's hidden water damage, code upgrades, or bad weather, surprises are part of the process. That’s why every successful home project needs a contingency fund.
What is a contingency budget?
It’s a separate reserve (10–20% of your total budget) set aside exclusively for unforeseen issues not for impulse upgrades or aesthetic “wish list” items.
Project Cost
Suggested Contingency
$15,000
$1,500 – $3,000
$50,000
$5,000 – $10,000
$100,000
$10,000 – $20,000
Expert Tip:
Do not use your contingency fund to finance upgrades like switching to marble countertops or adding built-in shelving. Those are scope changes, not emergencies. Stay disciplined.
Tracking Expenses & Monitoring Budget
Even with the best intentions, it's shockingly easy to lose track of spending mid-project. A coffee here, a new faucet there and suddenly, you’re wondering where the money went.
Set up a centralized system to track all project-related costs, including:
- Labor and contractor payments
- Material purchases
- Permit and inspection fees
- Equipment/tool rentals
- Deliveries and transportation
Tools You Can Use:
- Google Sheets or Excel: Simple, customizable, and shareable
- YNAB (You Need A Budget): A personal finance app that’s great for cash flow visibility
- Home renovation templates: Pre-built project budget templates available online for free
Expert Tip:
Compare actual spending vs. projected budget every week. This helps you spot overspending trends early and correct course before things get out of hand.
Monitoring Project Progress Against Timeline
Your budget isn’t the only thing you need to track. Timelines often stretch when scope creep sneaks in and time, like money, is easy to lose without active oversight.
Best Practices:
- Set milestone dates: For major tasks (e.g., demo complete, drywall finished, cabinets installed)
- Hold weekly reviews: With your contractor or team to compare progress against the schedule
- Adjust realistically: If delays occur (they will), update your timeline accordingly to reflect new completion dates
Expert Tip:
Regularly review project progress against the original scope, budget, and timeline. If one starts slipping, it’s a red flag that something may be changing or creeping.Recommended Tools:
- Trello: Create a task board with due dates, comments, and checklists
- Asana: Assign tasks and timelines, and monitor progress visually
- Houzz Pro or BuildBook: Home-focused project management tools with timeline tracking and communication features
These tools make it easier to stay organized and reduce the risk of forgotten tasks or delays due to poor coordination.
- Labor and contractor payments
Actionable Checklist: Preventing Scope Creep in Your Home Project
A step-by-step guide for homeowners to maintain control, avoid surprise costs, and ensure smooth execution at every phase of the renovation.
|
Action Step |
Description / Why It Helps |
Status |
|
Define Scope in Writing |
Create a detailed document outlining every aspect of the project before work begins. Prevents ambiguity. |
☐ Done |
|
Allocate Contingency Budget |
Set aside 10–20% of your total budget for unforeseen problems. Acts as your financial buffer. |
☐ Done |
|
Establish Formal Change Order Process |
Agree upfront on how changes will be documented and approved. Ensures transparency and control. |
☐Done |
|
Finalize All Design Decisions Upfront |
Decide on finishes, materials, and layouts before construction starts. Reduces mid-project changes. |
☐Done |
|
Prioritize “Must-Haves” |
List essential features separately from “nice-to-haves.” Helps stay on budget when cuts are needed. |
☐Done |
|
Set Clear Communication Protocols |
Define regular check-ins and preferred communication methods. Avoids delays and misunderstandings. |
☐Done |
|
Get Everything in Writing |
Ensure all contracts, quotes, and changes are documented and signed. Protects your interests legally. |
☐Done |
|
Regularly Review Progress |
Monitor progress weekly against your scope, budget, and timeline. Detects scope creep early. |
☐Done |
|
Practice Saying “No” Politely |
Be prepared to decline last-minute changes that increase costs or delay the timeline. Safeguards your project. |
☐Done |
|
Document with Photos |
Take detailed 'before,' 'during,' and 'after' photos. Provides a visual record of progress and workmanship. |
☐Done |
|
Understand “Problem” vs. “New Idea” |
Learn to differentiate between necessary fixes and optional upgrades. Helps manage expectations and spending. |
☐Done |
Usage Tips:
- Print this checklist and keep it in your renovation binder or digital project folder.
- Review it weekly throughout your project.
- Use the “Notes / Date Completed” column to log contractor meetings, milestone completions, or decisions made.
Post-Project Review: Learning for Next Time
After the dust settles and the final nail is in place, it’s time to pause not just to admire your transformed space, but to reflect on the journey you took to get here. Every home project, no matter how big or small, brings valuable lessons for the future.
Reflecting on the Project Journey
Start by asking yourself a few simple, yet powerful, questions:
- What went well?
Did communication flow smoothly? Was the project completed on time and within budget? Did your contractor exceed expectations? - What could have been better?
Were there delays, unexpected costs, or areas where decisions weren’t clear upfront? Did scope creep sneak in at any point? - Where did scope creep occur and how did we handle it?
Identifying these moments helps you understand what triggered changes and whether they were necessary, avoidable, or simply poorly timed.
💡 Real Homeowner Insight:
"We added recessed lighting mid-project on a whim. It seemed minor, but required electrical rerouting and delayed painting by two weeks. Next time, we’ll finalize lighting decisions upfront." – Emily T., Boston
Conclusion: Take Control Before Your Project Takes Over
Scope creep doesn’t have to be an inevitable part of home improvement. With proactive planning, clear communication, and disciplined execution, you can protect your vision, your budget, and your peace of mind.
You’ve now seen the hidden risks, psychological triggers, and common causes of scope creep and more importantly, you’ve been equipped with practical tools and proven strategies to stay in control.
🔑 Your home is your sanctuary not a construction site with no end in sight. The power to keep your project on track lies in your hands.
🚀 Ready to Take Control of Your Project?
Scope Creep Risk Assessment
Discover your vulnerability to project scope creep in just 5 questions
Your Action Plan
Keep following your process! Your next step is to download our Change Order Template to ensure every potential change is handled just as professionally.


